CSE 30124 - Introduction to Artificial Intelligence: Lab 04 (5 pts.)
- NETID:
This assignment covers the following topics:
- Text similarity with
collections.Counterand cosine similarity - Character-level tokenization (mapping text to integer sequences)
- Sequence padding with
pad_sequence - Embedding layers with
nn.Embedding - Recurrent neural networks with
nn.RNN
It will consist of 6 tasks:
| Task ID | Description | Points |
|---|---|---|
| 00 | Setup | 0 |
| 01 | BoC Similarity + Cipher Classification | 1 |
| 02 | Tokenize and Pad a Batch | 1 |
| 03 | Embedding Lookup | 1 |
| 04 | Build a CharRNN Model | 1 |
| 05 | Generate Police Report | 0 |
Please complete all sections. Some questions will require written answers, while others will involve coding. Be sure to run your code cells to verify your solutions.
Story Progression
Thanks to your work on homework03 and homework04, the police were able to fully extract the text from the kidnapping letters:
"v ybirq zheqrevat ze gurvfrasyblq ng gur rfgngr gur tnf jnf gur cresrpg zheqre jrncba vz fher vyy trg njnl jvgu vg nf jryy ubcrshyyl abobql svtherf bhg gur pbzovangvba bs gur cnqybpx cynl ba ybpxre 69 ba gur frpbaq sybbe bs phfuvat bgurejvfr v nz va erny gebhoyr"
Unfortunately, it appears that the text has been encoded somehow! As you try to recover from Thanksgiving break you realize that maybe you could treat this as a machine translation task. You could pretend the cipher is the source language and the plaintext is the target language.
If you could figure out the cipher then you could generate a training set of (cipher, plaintext) pairs. You could then train a seq2seq model to translate the ciphertext into plaintext!

import math
import string
import torch
import torch.nn as nn
import torch.nn.functional as F
from collections import Counter
from torch.nn.utils.rnn import pad_sequence

print(f"PyTorch version: {torch.__version__}")

device = torch.device('cuda' if torch.cuda.is_available() else 'mps' if torch.backends.mps.is_available() else 'cpu')
print(f"Using device:    {device}")

# --- Shared utilities used across tasks ---

# Character-level vocabulary
vocab = ('<PAD>', '<EOS>', '<UNK>', '<SOS>', ' ') + tuple(string.ascii_lowercase)
char2idx = {ch: i for i, ch in enumerate(vocab)}
idx2char = {i: ch for i, ch in enumerate(vocab)}

def encode(text):
    return [char2idx.get(ch, char2idx['<UNK>']) for ch in text.lower()]

def decode(indices):
    return ''.join(idx2char.get(i, '?') for i in indices)

print(f"Vocabulary size: {len(vocab)}")
print("Setup complete!")
PyTorch version: 2.8.0
Using device:    mps
Vocabulary size: 31
Setup complete!
Character Frequency Analysis for Ciphers
Why character-level analysis works: Simple substitution ciphers (like ROT13) preserve character frequencies!
ROT13 Character Mapping
| Original | ROT13 | Original | ROT13 |
|---|---|---|---|
| a → n | n → a | m → z | z → m |
| b → o | o → b | Every letter maps 1:1 |
Character Frequency Properties
# String filtering methods for character analysis
text = "Hello World! 123"

# Get only alphabetic characters
alpha_only = ''.join(filter(str.isalpha, text))      # "HelloWorld"
alphanum = ''.join(filter(str.isalnum, text))        # "HelloWorld123"
lowercase = text.lower()                             # "hello world! 123"

# Character frequency analysis
char_freq = Counter(filter(str.isalnum, text.lower()))
# Demonstrating why ROT13 preserves character frequencies
import codecs

original = "the quick brown fox"
rot13_version = codecs.decode(original, 'rot_13')

print(f"Original: '{original}'")
print(f"ROT13:    '{rot13_version}'")

# Character frequency analysis
orig_chars = Counter(filter(str.isalnum, original.lower()))
rot13_chars = Counter(filter(str.isalnum, rot13_version.lower()))

print(f"\n=== Character Frequency Comparison ===")
print(f"Original frequencies: {dict(orig_chars)}")
print(f"ROT13 frequencies:    {dict(rot13_chars)}")

# Key insight: Same total counts!
print(f"\nTotal characters - Original: {sum(orig_chars.values())}")
print(f"Total characters - ROT13:    {sum(rot13_chars.values())}")
print("✓ Character frequencies preserved - this is why BoC similarity works!")
Original: 'the quick brown fox'
ROT13:    'gur dhvpx oebja sbk'

=== Character Frequency Comparison ===
Original frequencies: {'t': 1, 'h': 1, 'e': 1, 'q': 1, 'u': 1, 'i': 1, 'c': 1, 'k': 1, 'b': 1, 'r': 1, 'o': 2, 'w': 1, 'n': 1, 'f': 1, 'x': 1}
ROT13 frequencies:    {'g': 1, 'u': 1, 'r': 1, 'd': 1, 'h': 1, 'v': 1, 'p': 1, 'x': 1, 'o': 1, 'e': 1, 'b': 2, 'j': 1, 'a': 1, 's': 1, 'k': 1}

Total characters - Original: 16
Total characters - ROT13:    16
✓ Character frequencies preserved - this is why BoC similarity works!
Cipher Classification Strategy
Different ciphers affect text properties differently. Here's how to identify them:
| Cipher Type | Character Frequency | Word Boundaries | Difficulty to Crack |
|---|---|---|---|
| ROT13/Caesar | Preserved exactly | Preserved | Easy |
| Vigenère | Slightly distorted | Preserved | Medium |
| Affine | Moderately distorted | Preserved | Medium |
| Substitution | Varies greatly | Preserved | Hard |
pycipher Library Usage
from pycipher import Caesar, Vigenere, Affine

# Encoding text with different ciphers
text = "hello world"
caesar13 = Caesar(13).encipher(text)    # ROT13
caesar3 = Caesar(3).encipher(text)      # Shift by 3
vigenere = Vigenere("key").encipher(text)
affine = Affine(5, 8).encipher(text)
# Cipher classification in action - testing different encryption methods
from pycipher import Caesar, Affine, Vigenere

test_phrase = "forensics evidence analysis"
mystery_text = "v ybirq zheqrevat ze gurvfrasyblq ng gur rfgngr"

print("=== Cipher Classification Test ===")
print(f"Test phrase: '{test_phrase}'")

# Generate cipher samples
ciphers = {
    "ROT13":    Caesar(13).encipher(test_phrase),
    "Caesar-3": Caesar(3).encipher(test_phrase),
    "Vigenère": Vigenere("key").encipher(test_phrase),
    "Affine":   Affine(5, 8).encipher(test_phrase)
}

print(f"\n{'Cipher':<12} {'Encrypted Text':<25} {'Char Freq Preserved?'}")
print("-" * 60)

# Analyze character frequency preservation
original_freq = Counter(filter(str.isalnum, test_phrase.lower()))
for name, encrypted in ciphers.items():
    cipher_freq = Counter(filter(str.isalnum, encrypted.lower()))
    preserved = "✓ Yes" if sum(original_freq.values()) == sum(cipher_freq.values()) else "✗ No"
    print(f"{name:<12} {encrypted[:25]:<25} {preserved}")

print(f"\nMystery text to classify: '{mystery_text[:30]}...'")
print("Next: Use BoC similarity to determine which cipher was used!")
=== Cipher Classification Test ===
Test phrase: 'forensics evidence analysis'

Cipher       Encrypted Text            Char Freq Preserved?
------------------------------------------------------------
ROT13        SBERAFVPFRIVQRAPRNANYLFVF ✓ Yes
Caesar-3     IRUHQVLFVHYLGHQFHDQDOBVLV ✓ Yes
Vigenère     PSPORQSGQOZGNILMIYXEJIWGC ✓ Yes
Affine       HAPCVUWSUCJWXCVSCIVILYUWU ✓ Yes

Mystery text to classify: 'v ybirq zheqrevat ze gurvfrasy...'
Next: Use BoC similarity to determine which cipher was used!
Text Similarity for Cipher Classification
Before analyzing the encrypted ransom note, we need to understand how to measure text similarity. This is crucial for determining which cipher was used.
Cosine Similarity Formula
Cosine similarity measures the angle between two vectors, giving us a value between 0 (completely different) and 1 (identical).
| Similarity Score | Meaning |
|---|---|
| 1.0 | Identical direction (very similar) |
| 0.5 | Moderate similarity |
| 0.0 | Perpendicular (very different) |
Basic Cosine Similarity Implementation
# Basic cosine similarity - the math behind text comparison
import math

def simple_cosine(vec1, vec2):
    """Calculate cosine similarity between two vectors"""
    # TODO: Calculate cosine similarity

    return dot_product / (mag1 * mag2) if mag1 > 0 and mag2 > 0 else 0.0

# Example: Word frequency vectors
# Document A: "cat dog cat" -> [2, 1, 0] (cat=2, dog=1, bird=0)
# Document B: "cat dog bird" -> [1, 1, 1]
doc_a = [2, 1, 0]  # cat, dog, bird counts
doc_b = [1, 1, 1]
doc_c = [0, 0, 2]  # only birds

print(f"A vs B similarity: {simple_cosine(doc_a, doc_b):.3f}")
print(f"A vs C similarity: {simple_cosine(doc_a, doc_c):.3f}")
print("Higher scores = more similar texts")
A vs B similarity: 0.775
A vs C similarity: 0.000
Higher scores = more similar texts
Bag-of-Words vs Bag-of-Characters
For cipher analysis, we need to choose the right text representation:
| Method | What it counts | Best for |
|---|---|---|
| Bag-of-Words | Word frequencies | Semantic similarity, topic matching |
| Bag-of-Characters | Character frequencies | Cipher analysis, language detection |
Useful Counter Operations in Python
from collections import Counter

# Creating and comparing counters
text_counts = Counter("hello world".split())  # Word counts
char_counts = Counter("hello world")          # Character counts

# Get specific counts
text_counts['hello']  # Returns: 1
char_counts['l']      # Returns: 3

# Finding common elements
counter1 & counter2   # Intersection (minimum counts)
counter1 | counter2   # Union (maximum counts)
Task 01: Text Similarity
Task 01-1: Description (0 pts.)
Bag-of-Words
Your first step is to figure out which cipher was most likely used to encode the kidnapping letters. To do this, you should test a Bag of Words and a Bag of Characters similarity metric. As with most of machine learning, we need to somehow convert our text into a vector to allow us to compare it to other vectors. One option would be to use a pre-trained embedding network like word2vec or GloVe (this would be like using the output of convolutional layers as features for MNIST). However, for now we will just use a Bag of Words and an N-Gram model instead (much simpler).
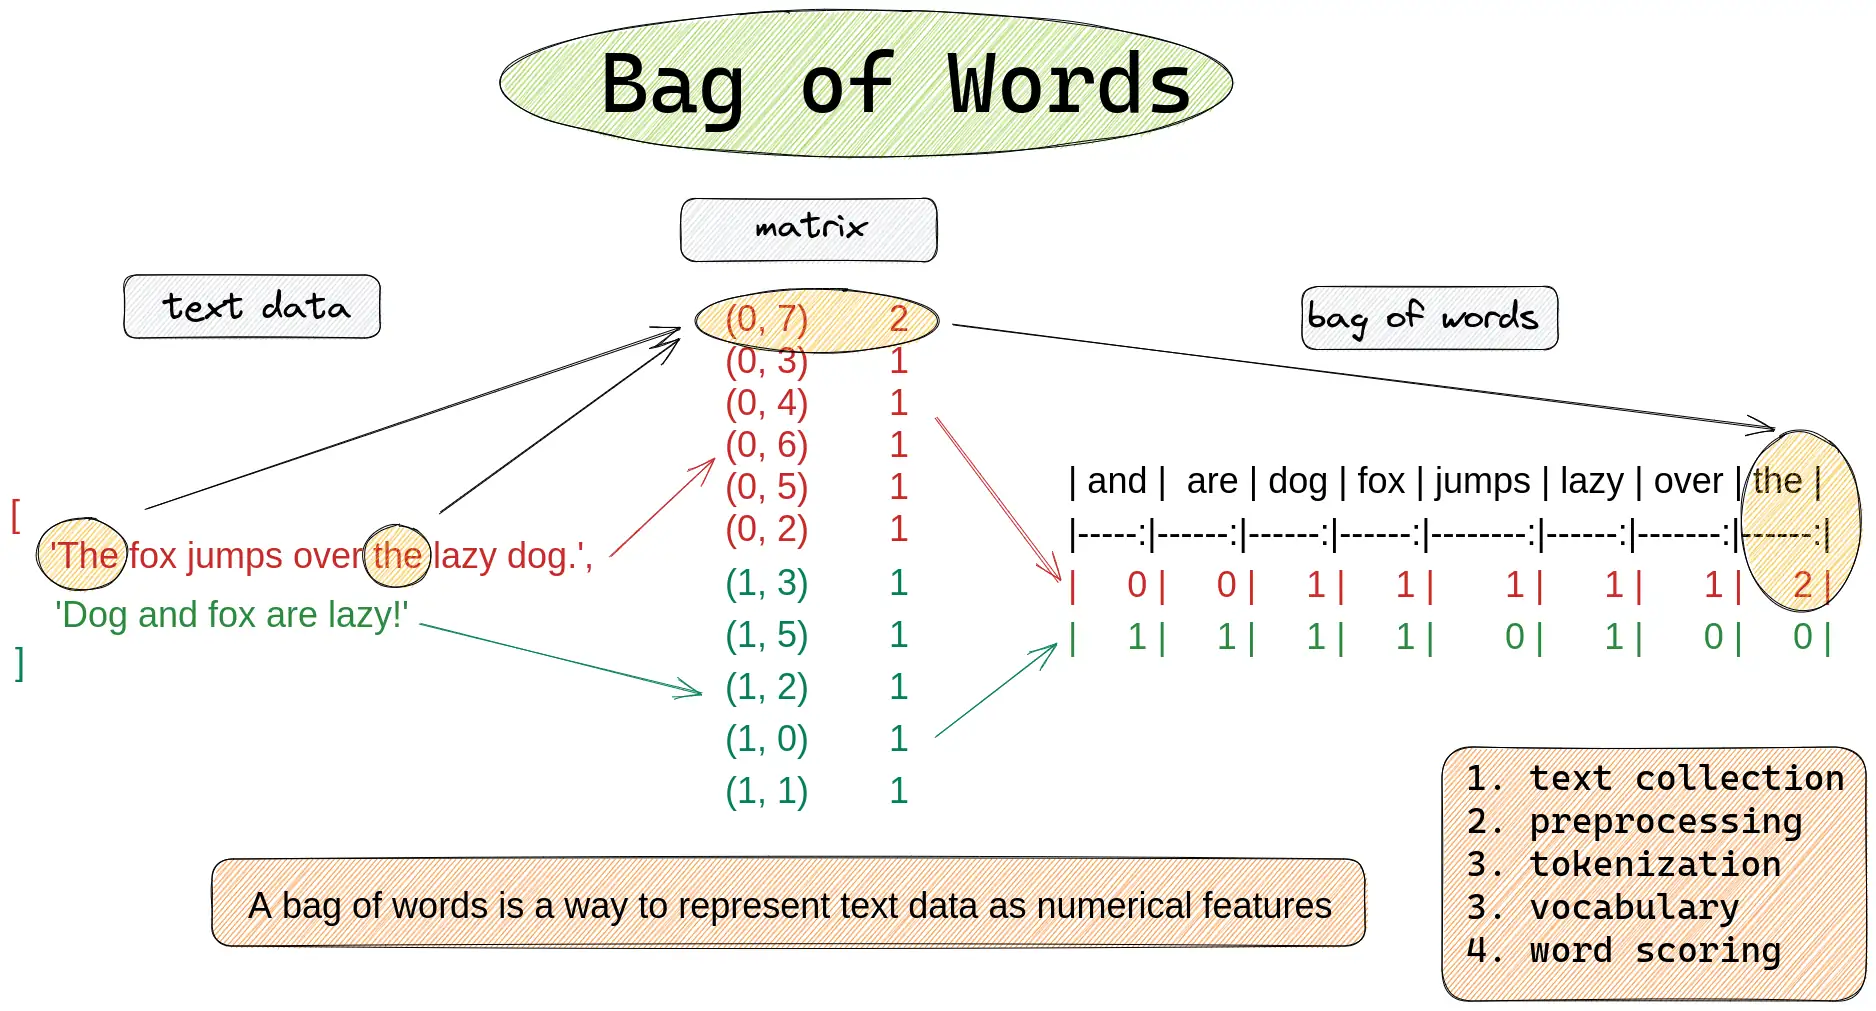
In the cell below, write the code for the Bag-of-Words comparison
Task 01-1: Code (0.5 pt.)
Neural Network Text Processing Pipeline
To train a neural network on cipher text, we need to convert text into numbers. This process has several steps:
Raw Text → Tokenization → Encoding → Padding → Embedding → Neural Network
"hello"  → ['h','e','l','l','o'] → [12,9,16,16,19] → [12,9,16,16,19,1,0,0] → vectors → predictions
Tokenization Approaches Comparison
| Method | Vocabulary Size | Memory Usage | Best For |
|---|---|---|---|
| Word-level | 10,000-100,000+ | High | Semantic tasks, translation |
| Character-level | ~30-50 | Low | Ciphers, spelling, unknown words |
| Subword (BPE) | 1,000-10,000 | Medium | Modern language models |
PyTorch Text Processing Tools
import torch
from torch.nn.utils.rnn import pad_sequence

# Convert to tensor
tokens = torch.tensor([1, 2, 3], dtype=torch.long)

# Pad sequences to same length
sequences = [torch.tensor([1,2]), torch.tensor([3,4,5,6])]
padded = pad_sequence(sequences, batch_first=True, padding_value=0)
# Comparing tokenization approaches for cipher text
cipher_text = "uryyb jbeyq"  # ROT13 of "hello world"

# Word-level tokenization
word_tokens = cipher_text.split()
print(f"Word tokens: {word_tokens}")
print(f"Word vocab needed: {len(set(word_tokens))} unique tokens")

# Character-level tokenization
char_tokens = list(cipher_text.lower())
print(f"\nChar tokens: {char_tokens}")
print(f"Char vocab needed: {len(set(char_tokens))} unique characters")

# Character encoding with vocabulary
vocab = ['<PAD>', '<EOS>', '<UNK>', '<SOS>', ' '] + list('abcdefghijklmnopqrstuvwxyz')
char2idx = {ch: i for i, ch in enumerate(vocab)}

encoded = [char2idx.get(ch, char2idx['<UNK>']) for ch in cipher_text.lower()]
print(f"\nEncoded indices: {encoded}")
print(f"Total vocabulary size: {len(vocab)}")

print(f"\n✓ Character-level tokenization wins for ciphers:")
print(f"  - Small vocabulary ({len(vocab)} vs {len(set(word_tokens))*1000}+ for words)")
print(f"  - Works with any cipher text (no unknown words)")
print(f"  - Ciphers operate on individual characters anyway")
Word tokens: ['uryyb', 'jbeyq']
Word vocab needed: 2 unique tokens

Char tokens: ['u', 'r', 'y', 'y', 'b', ' ', 'j', 'b', 'e', 'y', 'q']
Char vocab needed: 8 unique characters

Encoded indices: [25, 22, 29, 29, 6, 4, 14, 6, 9, 29, 21]
Total vocabulary size: 31

✓ Character-level tokenization wins for ciphers:
  - Small vocabulary (31 vs 2000+ for words)
  - Works with any cipher text (no unknown words)
  - Ciphers operate on individual characters anyway
Special Tokens for Neural Networks
Neural networks need special control tokens to handle variable-length text and sequence boundaries:
| Token | Index | Purpose | When Used |
|---|---|---|---|
<PAD> |
0 | Padding shorter sequences | Always at the end |
<EOS> |
1 | End of sequence marker | After real text |
<UNK> |
2 | Unknown character | For characters not in vocab |
<SOS> |
3 | Start of sequence | At beginning (for generation) |
pad_sequence Function Usage
from torch.nn.utils.rnn import pad_sequence

# pad_sequence parameters
sequences = [tensor1, tensor2, tensor3]  # List of 1D tensors
padded = pad_sequence(
    sequences,
    batch_first=True,     # Output shape: (batch, max_len)
    padding_value=0       # Use <PAD> token (index 0)
)
# Practical padding example with cipher text
import torch
from torch.nn.utils.rnn import pad_sequence

# Sample cipher texts (different lengths)
cipher_samples = ["uryyb", "jbeyq", "nv vf sha"]
print(f"Original texts: {cipher_samples}")
print(f"Lengths: {[len(s) for s in cipher_samples]}")

# Encode each text (including <EOS> token)
vocab = ['<PAD>', '<EOS>', '<UNK>', '<SOS>', ' '] + list('abcdefghijklmnopqrstuvwxyz')
char2idx = {ch: i for i, ch in enumerate(vocab)}

encoded_sequences = []
for text in cipher_samples:
    encoded = [char2idx.get(ch, char2idx['<UNK>']) for ch in text.lower()]
    encoded.append(char2idx['<EOS>'])  # Add end-of-sequence marker
    encoded_sequences.append(torch.tensor(encoded, dtype=torch.long))

print(f"\nEncoded sequences: {[seq.tolist() for seq in encoded_sequences]}")

# Pad to same length for neural network processing
padded_batch = pad_sequence(encoded_sequences, batch_first=True, padding_value=0)
print(f"\nPadded batch shape: {padded_batch.shape}")
print(f"Padded batch:\n{padded_batch}")

print("\n✓ Now all sequences have the same length for batch processing!")
print("✓ Shorter sequences padded with <PAD> tokens (index 0)")
Original texts: ['uryyb', 'jbeyq', 'nv vf sha']
Lengths: [5, 5, 9]

Encoded sequences: [[25, 22, 29, 29, 6, 1], [14, 6, 9, 29, 21, 1], [18, 26, 4, 26, 10, 4, 23, 12, 5, 1]]

Padded batch shape: torch.Size([3, 10])
Padded batch:
tensor([[25, 22, 29, 29,  6,  1,  0,  0,  0,  0],
        [14,  6,  9, 29, 21,  1,  0,  0,  0,  0],
        [18, 26,  4, 26, 10,  4, 23, 12,  5,  1]])

✓ Now all sequences have the same length for batch processing!
✓ Shorter sequences padded with <PAD> tokens (index 0)
Neural Network Embeddings
Token indices (like 5, 12, 19) are just arbitrary numbers. Neural networks need meaningful vector representations where similar characters have similar vectors.
Embedding Layer Parameters
| Parameter | Purpose | Example Value |
|---|---|---|
num_embeddings |
Vocabulary size | 31 (for our character vocab) |
embedding_dim |
Vector size per token | 32, 64, 128, 256 |
padding_idx |
Index that stays zero | 0 (for <PAD> token) |
nn.Embedding API
import torch.nn as nn

# Create embedding layer
embed = nn.Embedding(
    num_embeddings=vocab_size,    # How many tokens in vocabulary
    embedding_dim=64,             # Size of each embedding vector
    padding_idx=0                 # Keep <PAD> embeddings at zero
)

# Convert token indices to vectors
token_ids = torch.tensor([5, 12, 19])  # Shape: (3,)
vectors = embed(token_ids)             # Shape: (3, 64)
# Embedding layer demonstration
import torch
import torch.nn as nn
import torch.nn.functional as F

vocab_size = 31  # Our character vocabulary size
embedding_dim = 8  # Small dimension for demonstration

# TODO: Create embedding layer

# Sample character indices
h_idx = 12  # 'h'
e_idx = 9   # 'e'
pad_idx = 0 # '<PAD>'

print(f"=== Embedding Layer Demo ===")
print(f"Vocabulary size: {vocab_size}")
print(f"Embedding dimension: {embedding_dim}")

# TODO: Get embedding vectors
h_vector = None
e_vector = None
pad_vector = None

print(f"\n'h' (index {h_idx}) embedding: {h_vector.detach()[:4]}... (showing first 4 dims)")
print(f"'e' (index {e_idx}) embedding: {e_vector.detach()[:4]}...")
print(f"<PAD> embedding: {pad_vector.detach()}")

# Verify padding stays at zero
print(f"\nPadding vector norm: {pad_vector.norm().item():.6f} (should be 0.0)")
print(f"'h' vector norm: {h_vector.norm().item():.6f} (should be > 0)")

# Memory comparison
one_hot_size = vocab_size  # One-hot vector size
dense_size = embedding_dim  # Dense embedding size
print(f"\nMemory efficiency:")
print(f"One-hot vector size: {one_hot_size} elements")
print(f"Dense embedding size: {dense_size} elements")
print(f"Space savings: {one_hot_size/dense_size:.1f}x smaller")
=== Embedding Layer Demo ===
Vocabulary size: 31
Embedding dimension: 8

'h' (index 12) embedding: tensor([-0.1405, -0.8948, -1.5430, -0.6113])... (showing first 4 dims)
'e' (index 9) embedding: tensor([-1.5156, -0.3737, -0.5673, -0.8262])...
<PAD> embedding: tensor([0., 0., 0., 0., 0., 0., 0., 0.])

Padding vector norm: 0.000000 (should be 0.0)
'h' vector norm: 3.141674 (should be > 0)

Memory efficiency:
One-hot vector size: 31 elements
Dense embedding size: 8 elements
Space savings: 3.9x smaller
Embedding Training and padding_idx
During training, embedding vectors learn to represent character relationships:
| Training Stage | What Embeddings Learn |
|---|---|
| Initial | Random vectors, no meaningful relationships |
| After training | Similar characters cluster together |
| Fully trained | Vowels cluster, consonants cluster, patterns emerge |
The padding_idx Parameter
Setting padding_idx=0 ensures the <PAD> token embedding:
- Starts at zero vector
- Never gets updated during training
- Always contributes zero to computations
# Demonstrating padding_idx behavior
embed_with_padding = nn.Embedding(5, 3, padding_idx=0)
embed_without_padding = nn.Embedding(5, 3)  # No special padding handling

print("=== padding_idx Demonstration ===")
print("With padding_idx=0:")
print(embed_with_padding.weight)
print(f"Row 0 (padding): {embed_with_padding.weight[0]}")

print("\nWithout padding_idx:")
print(embed_without_padding.weight)
print(f"Row 0 (no special treatment): {embed_without_padding.weight[0]}")

# Simulate training effect on padding
input_batch = torch.tensor([[1, 2, 0], [3, 4, 0]])  # 0 is padding
embedded = embed_with_padding(input_batch)

print(f"\nInput batch: {input_batch}")
print(f"Embedded shape: {embedded.shape}")
print(f"Padding positions (index 0) norm: {embedded[:, 2, :].norm(dim=1)}")
print("✓ Padding positions stay at zero norm!")

# Character similarity after hypothetical training
print(f"\n=== Hypothetical Training Results ===")
print("Before training: random similarities")
print("After training: vowels cluster, consonants cluster")
print("Example: 'a' and 'e' vectors become more similar")
print("         'b' and 'c' vectors become more similar")
=== padding_idx Demonstration ===
With padding_idx=0:
Parameter containing:
tensor([[ 0.0000,  0.0000,  0.0000],
        [ 0.7527, -0.9404,  0.6075],
        [ 0.6254, -1.4316,  0.8993],
        [ 0.5133,  0.0357,  0.3494],
        [-0.7468,  0.6151,  0.3374]], requires_grad=True)
Row 0 (padding): tensor([0., 0., 0.], grad_fn=<SelectBackward0>)

Without padding_idx:
Parameter containing:
tensor([[-1.1884,  0.6572, -0.2388],
        [ 0.2231,  1.2486, -1.0726],
        [ 0.3739, -0.5002, -0.2082],
        [ 0.2274,  1.5067, -1.2908],
        [ 0.4142,  0.4703, -1.3250]], requires_grad=True)
Row 0 (no special treatment): tensor([-1.1884,  0.6572, -0.2388], grad_fn=<SelectBackward0>)

Input batch: tensor([[1, 2, 0],
        [3, 4, 0]])
Embedded shape: torch.Size([2, 3, 3])
Padding positions (index 0) norm: tensor([0., 0.], grad_fn=<LinalgVectorNormBackward0>)
✓ Padding positions stay at zero norm!

=== Hypothetical Training Results ===
Before training: random similarities
After training: vowels cluster, consonants cluster
Example: 'a' and 'e' vectors become more similar
         'b' and 'c' vectors become more similar
Recurrent Neural Networks (RNNs)
Embeddings give us meaningful character vectors, but sequence order matters for cipher decoding. RNNs process text sequentially, building context as they go.
RNN vs Other Architectures
| Architecture | Processing | Memory | Best For |
|---|---|---|---|
| Feedforward NN | All at once | None | Fixed-size inputs |
| RNN | Sequential | Hidden state | Variable sequences, order matters |
| CNN | Sliding window | None | Local patterns, images |
| Transformer | Parallel attention | Self-attention | Long sequences, parallelizable |
RNN Hidden State Concept
The hidden state is the RNN's "memory" - it carries information from previous time steps:
# Conceptual RNN operation
for t, char in enumerate(sequence):
    h[t] = activation(W_h @ h[t-1] + W_x @ char_embedding[t] + bias)
    output[t] = W_out @ h[t]  # Prediction at each step
# RNN processing demonstration - step by step
cipher_word = "uryyb"  # ROT13 for "hello"
hidden_size = 4

print("=== RNN Sequential Processing ===")
print(f"Processing cipher: '{cipher_word}' (ROT13 of 'hello')")
print(f"Hidden state size: {hidden_size}")

hidden_state = torch.zeros(hidden_size)
print(f"\nInitial hidden state: {hidden_state}")

# Simulate RNN processing
for step, char in enumerate(cipher_word):
    print(f"\nStep {step + 1}: Processing '{char}'")

    # Simulate combining current input with previous memory
    # (In reality this involves learned weight matrices)
    char_influence = torch.randn(hidden_size) * 0.1  # Current character effect
    hidden_state = hidden_state * 0.7 + char_influence  # Combine with memory

    print(f"  Hidden state: {hidden_state[:2]}... (showing first 2 dims)")
    print(f"  Context so far: '{cipher_word[:step+1]}'")

print(f"\n✓ Final hidden state contains information about entire sequence!")
print(f"✓ Later characters have access to context from earlier characters")
print(f"✓ This context helps decode: 'uryyb' -> 'hello'")
=== RNN Sequential Processing ===
Processing cipher: 'uryyb' (ROT13 of 'hello')
Hidden state size: 4

Initial hidden state: tensor([0., 0., 0., 0.])

Step 1: Processing 'u'
  Hidden state: tensor([0.1548, 0.0693])... (showing first 2 dims)
  Context so far: 'u'

Step 2: Processing 'r'
  Hidden state: tensor([0.0028, 0.0518])... (showing first 2 dims)
  Context so far: 'ur'

Step 3: Processing 'y'
  Hidden state: tensor([-0.0359,  0.1620])... (showing first 2 dims)
  Context so far: 'ury'

Step 4: Processing 'y'
  Hidden state: tensor([-0.1732,  0.1161])... (showing first 2 dims)
  Context so far: 'uryy'

Step 5: Processing 'b'
  Hidden state: tensor([-0.1179,  0.0444])... (showing first 2 dims)
  Context so far: 'uryyb'

✓ Final hidden state contains information about entire sequence!
✓ Later characters have access to context from earlier characters
✓ This context helps decode: 'uryyb' -> 'hello'
Why RNNs Excel at Cipher Decoding
Cipher decoding benefits from accumulating context - later characters are easier to decode when you know what came before:
| Position | Cipher | Possible Letters | Context Available |
|---|---|---|---|
| 1 | 'u' | Many possibilities | None |
| 2 | 'ur' | Fewer possibilities | Previous char |
| 3 | 'ury' | Very few possibilities | Previous 2 chars |
| 4 | 'uryy' | Almost certain | Previous 3 chars |
| 5 | 'uryyb' | Definitely "hello" | Full context |
# Context accumulation in cipher decoding
cipher = "uryyb jbeyq"  # ROT13 of "hello world"

print("=== Context Accumulation Example ===")
print(f"Cipher text: '{cipher}'")

# Show how context helps narrow possibilities
positions = [
    ("u", "Many: h, u, n, a, e, ..."),
    ("ur", "Fewer: he, uh, an, ..."),
    ("ury", "Very few: hel, ..."),
    ("uryy", "Almost certain: hell"),
    ("uryyb", "Definitely: hello"),
    ("uryyb j", "hello w..."),
    ("uryyb jb", "hello wo..."),
    ("uryyb jbeyq", "hello world!")
]

for partial, interpretation in positions:
    print(f"'{partial}' -> {interpretation}")

print(f"\n✓ RNN builds this context incrementally")
print(f"✓ Each new character improves prediction accuracy")
print(f"✓ Final context: '{cipher}' -> 'hello world'")

# Decoding verification
import codecs
decoded = codecs.decode(cipher, 'rot_13')
print(f"✓ Verified: '{cipher}' decodes to '{decoded}'")
=== Context Accumulation Example ===
Cipher text: 'uryyb jbeyq'
'u' -> Many: h, u, n, a, e, ...
'ur' -> Fewer: he, uh, an, ...
'ury' -> Very few: hel, ...
'uryy' -> Almost certain: hell
'uryyb' -> Definitely: hello
'uryyb j' -> hello w...
'uryyb jb' -> hello wo...
'uryyb jbeyq' -> hello world!

✓ RNN builds this context incrementally
✓ Each new character improves prediction accuracy
✓ Final context: 'uryyb jbeyq' -> 'hello world'
✓ Verified: 'uryyb jbeyq' decodes to 'hello world'
Lab Summary: NLP Tools for Cipher Decoding
You've built a complete neural network pipeline for text processing! Here's what each component does:
Core Components Mastered
| Component | Input | Output | Purpose |
|---|---|---|---|
| Text Similarity | Raw text | Similarity score | Cipher classification |
| Tokenization | Text strings | Token indices | Neural network input |
| Embedding | Token indices | Dense vectors | Meaningful representations |
| RNN | Vector sequences | Hidden states | Sequential context building |
| Linear Layer | Hidden states | Vocab predictions | Character-level decoding |
The Complete Pipeline
Mystery Cipher Text → Similarity Analysis → Tokenization → Neural Network → Decoded Text
"uryyb jbeyq"       → "ROT13 detected"   → [25,22,30...] → RNN processing → "hello world"
HW05 Preview: What's Next
In the next homework you'll:
- Train these models to actually decode ROT13 (no more random predictions!)
- Build from scratch - implement RNN and embedding layers yourself
- Real cipher decoding - apply to the actual ransom note evidence
- Performance comparison - RNN vs traditional approaches
Real-World Applications
These same techniques power:
- Google Translate - sequence-to-sequence translation
- Autocorrect - character-level language modeling
- Code completion - GitHub Copilot uses similar architectures
- DNA analysis - biological sequence processing
The tools you learned scale from simple ROT13 to modern language models!
PyTorch RNN Architecture
Our cipher decoder follows this pipeline:
Input Tokens → Embedding → RNN → Linear → Output Logits
[5,12,19] → vectors → hidden states → projections → [vocab_probs...]
nn.RNN Parameters
| Parameter | Purpose | Typical Values |
|---|---|---|
input_size |
Embedding dimension | 32, 64, 128 |
hidden_size |
RNN memory capacity | 64, 128, 256 |
batch_first |
Input shape format | True for (batch, seq, features) |
num_layers |
Stacked RNN layers | 1, 2, 3 |
# Complete RNN architecture walkthrough
batch_size, seq_len, vocab_size = 2, 6, 31
embed_dim, hidden_size = 32, 64

print("=== RNN Architecture Pipeline ===")

# Step 1: Create sample input (cipher text as token indices)
input_tokens = torch.tensor([[12, 9, 16, 16, 19, 1], [25, 22, 24, 1, 0, 0]])  # Example: "hello<EOS>", "xyz<EOS><PAD><PAD>"
print(f"1. Input tokens shape: {input_tokens.shape}")
print(f"   Sample: {input_tokens[0].tolist()} -> 'h','e','l','l','o','<EOS>'")

# Step 2: Embedding layer
embed_layer = nn.Embedding(vocab_size, embed_dim, padding_idx=0)
embedded = embed_layer(input_tokens)
print(f"\n2. After embedding: {embedded.shape}")
print(f"   Each token -> {embed_dim}D vector")

# Step 3: RNN processing
rnn = nn.RNN(input_size=embed_dim, hidden_size=hidden_size, batch_first=True)
rnn_output, final_hidden = rnn(embedded)
print(f"\n3. RNN output shape: {rnn_output.shape}")
print(f"   Final hidden shape: {final_hidden.shape}")
print(f"   RNN processes sequence, builds context")

# Step 4: Linear projection to vocabulary
linear = nn.Linear(hidden_size, vocab_size)
logits = linear(rnn_output)
print(f"\n4. Final logits shape: {logits.shape}")
print(f"   Each position predicts next character")

# Step 5: Convert to predictions
predictions = torch.argmax(logits, dim=-1)
print(f"\n5. Predictions shape: {predictions.shape}")
print(f"   Predicted tokens: {predictions[0].tolist()}")

print(f"\n✓ Complete pipeline: tokens -> embeddings -> RNN -> predictions")
print(f"✓ Ready for training on (cipher, plaintext) pairs!")
=== RNN Architecture Pipeline ===
1. Input tokens shape: torch.Size([2, 6])
   Sample: [12, 9, 16, 16, 19, 1] -> 'h','e','l','l','o','<EOS>'

2. After embedding: torch.Size([2, 6, 32])
   Each token -> 32D vector

3. RNN output shape: torch.Size([2, 6, 64])
   Final hidden shape: torch.Size([1, 2, 64])
   RNN processes sequence, builds context

4. Final logits shape: torch.Size([2, 6, 31])
   Each position predicts next character

5. Predictions shape: torch.Size([2, 6])
   Predicted tokens: [12, 21, 23, 23, 30, 24]

✓ Complete pipeline: tokens -> embeddings -> RNN -> predictions
✓ Ready for training on (cipher, plaintext) pairs!
# TODO: Implement Bag-of-Words similarity
def bow_similarity(text1, text2):

    return cosine_sim(c1, c2)
Task 01-2: Description (0 pts.)
N-Gram/Bag-of-Characters Comparison
If you can remember all the way back to lecture07: Markov Models, you'll remember that we've actually seen these before, in the context of a Markov Babbler!
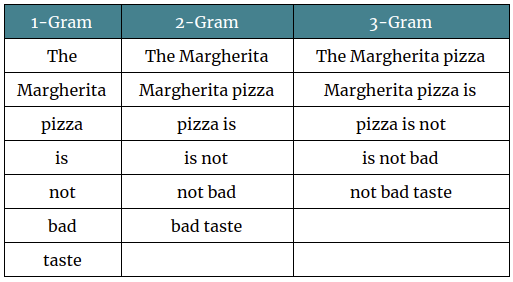
However for this task, I'd recommend using a character level N-Gram model instead, as we just want to compare character frequencies, it's tough to predict how ciphers will modify words and there's unlikely to be any overlap between the two.
Task 01-2: Code (0.5 pt.)
# TODO: Implement Bag-of-Characters similarity
def boc_similarity(text1, text2):

    return cosine_sim(c1, c2)
Task 01-3: Cipher Classification (1 pt.)
Now use our two text comparison methods to classify the cipher used on the ransom note.
Steps:
- Implement
boc_similarity(text1, text2)— like BoW but counting characters (filter to alphanumeric withstr.isalnum(), convert to lowercase) - Encode a test string with 4 different ciphers using
pycipher:Caesar(13),Caesar(3),Vigenere("key"),Affine(5, 8) - Compute BoW and BoC similarity between each encoded string and the mystery text
- Print which cipher has the highest combined similarity
Task 01: Code (1 pt.)
from pycipher import Caesar, Affine, Vigenere

# The encoded ransom note text
encrypted_text = "v ybirq zheqrevat ze gurvfrasyblq ng gur rfgngr gur tnf jnf gur cresrpg zheqre jrncba vz fher vyy trg njnl jvgu vg nf jryy ubcrshyyl abobql svtherf bhg gur pbzovangvba bs gur cnqybpx cynl ba ybpxre 69 ba gur frpbaq sybbe bs phfuvat bgurejvfr v nz va erny gebhoyr"

# Test text to encode with different ciphers
test_text = ("Lorem ipsum dolor sit amet, consectetur adipiscing elit, "
             "sed do eiusmod tempor incididunt ut labore et dolore magna aliqua.")
print(f"Test text: {test_text[:60]}...")

# Encode test text with each cipher
ciphers = {
    "ROT13":    Caesar(13).encipher(test_text),
    "Caesar-3": Caesar(3).encipher(test_text),
    "Vigenere":  Vigenere("key").encipher(test_text),
    "Affine":   Affine(5, 8).encipher(test_text),
}

print(f"\n{'Cipher':<12} {'BoW Sim':>8} {'BoC Sim':>8} {'Combined':>9}")
print("-" * 40)

best_cipher = None
best_score = -1

for name, encoded in ciphers.items():
    # TODO: Compute BoW and BoC similarity for each cipher vs the mystery text

    combined = bow + boc
    print(f"{name:<12} {bow:>8.4f} {boc:>8.4f} {combined:>9.4f}")
    if combined > best_score:
        best_score = combined
        best_cipher = name

print(f"\nMost likely cipher: {best_cipher}")
Test text: Lorem ipsum dolor sit amet, consectetur adipiscing elit, sed...

Cipher        BoW Sim  BoC Sim  Combined
----------------------------------------
ROT13          0.0000   0.9198    0.9198
Caesar-3       0.0000   0.6023    0.6023
Vigenere       0.0000   0.6518    0.6518
Affine         0.0000   0.4254    0.4254

Most likely cipher: ROT13
Task 01: Expected Output (1 pt.)
Test text: Lorem ipsum dolor sit amet, consectetur adipiscing elit, sed...

Cipher        BoW Sim  BoC Sim  Combined
----------------------------------------
ROT13          0.0000   0.9198    0.9198
Caesar-3       0.0000   0.6023    0.6023
Vigenere       0.0000   0.6518    0.6518
Affine         0.0000   0.4254    0.4254

Most likely cipher: ROT13
ROT13 should have the highest combined similarity since it preserves character frequency distributions (each letter maps to exactly one other letter with the same frequency pattern).
Story Progression
"ROT13," Detective Gaff confirms. "Classic. Now we could just decode it directly — ROT13 is its own inverse — but Director Bryant wants an AI solution. He says we need to train a neural network that can decode any simple cipher, not just ROT13."
To train a neural network on text, you first need to convert characters into numbers. That process is called tokenization...

Task 02: Tokenize and Pad a Batch (1 pt.)
Create a function that takes a list of plaintext strings, encodes each one, and produces a padded batch tensor ready for a neural network.
Steps:
- Write
encode_batch(texts, char2idx)that:- Encodes each text string using
char2idx(lowercase, unknown chars map to<UNK>) - Appends an
<EOS>token to each encoded sequence - Converts each to a
torch.longtensor - Pads using
pad_sequencewithbatch_first=Trueandpadding_value=0(the<PAD>index)
- Encodes each text string using
- Also create the corresponding ROT13-encoded targets for each text (hint: use
codecs.decode(text, 'rot_13')to get the ROT13 version) - Test on the provided sample texts
Task 02: Code (1 pt.)
import codecs

# encode_batch
def encode_batch(texts, char2idx):
    eos_idx = char2idx['<EOS>']
    unk_idx = char2idx['<UNK>']
    batch = []
    for text in texts:
        encoded = [char2idx.get(ch, unk_idx) for ch in text.lower()]
        encoded.append(eos_idx)  # append EOS
        batch.append(torch.tensor(encoded, dtype=torch.long))
    return pad_sequence(batch, batch_first=True, padding_value=char2idx['<PAD>'])

# Sample texts
sample_texts = [
    "hello world",
    "the quick brown fox",
    "ai is fun",
    "cipher text"
]

# TODO: Encode the plaintext

print(f"Plaintext batch shape: {plain_batch.shape}")
print(f"Plaintext batch:\n{plain_batch}")

# TODO: Create ROT13 encoded versions

print(f"\nROT13 texts: {rot13_texts}")
print(f"Cipher batch shape: {cipher_batch.shape}")

# Verify: decode the first sequence back
decoded_plain = decode(plain_batch[0].tolist())
decoded_cipher = decode(cipher_batch[0].tolist())
print(f"\nDecoded plain[0]:  '{decoded_plain}'")
print(f"Decoded cipher[0]: '{decoded_cipher}'")
Plaintext batch shape: torch.Size([4, 20])
Plaintext batch:
tensor([[12,  9, 16, 16, 19,  4, 27, 19, 22, 16,  8,  1,  0,  0,  0,  0,  0,  0,
          0,  0],
        [24, 12,  9,  4, 21, 25, 13,  7, 15,  4,  6, 22, 19, 27, 18,  4, 10, 19,
         28,  1],
        [ 5, 13,  4, 13, 23,  4, 10, 25, 18,  1,  0,  0,  0,  0,  0,  0,  0,  0,
          0,  0],
        [ 7, 13, 20, 12,  9, 22,  4, 24,  9, 28, 24,  1,  0,  0,  0,  0,  0,  0,
          0,  0]])

ROT13 texts: ['uryyb jbeyq', 'gur dhvpx oebja sbk', 'nv vf sha', 'pvcure grkg']
Cipher batch shape: torch.Size([4, 20])

Decoded plain[0]:  'hello world<EOS><PAD><PAD><PAD><PAD><PAD><PAD><PAD><PAD>'
Decoded cipher[0]: 'uryyb jbeyq<EOS><PAD><PAD><PAD><PAD><PAD><PAD><PAD><PAD>'
Task 02: Expected Output (1 pt.)
Plaintext batch shape: torch.Size([4, 20])
Plaintext batch:
tensor([[12,  9, 16, 16, 19,  4, 27, 19, 22, 16,  8,  1,  0,  0,  0,  0,  0,  0,
          0,  0],
        [24, 12,  9,  4, 21, 25, 13,  7, 15,  4,  6, 22, 19, 27, 18,  4, 10, 19,
         28,  1],
        [ 5, 13,  4, 13, 23,  4, 10, 25, 18,  1,  0,  0,  0,  0,  0,  0,  0,  0,
          0,  0],
        [ 7, 13, 20, 12,  9, 22,  4, 24,  9, 28, 24,  1,  0,  0,  0,  0,  0,  0,
          0,  0]])

ROT13 texts: ['uryyb jbeyq', 'gur dhvpx oebja sbk', 'nv vf sha', 'pvcure grkg']
Cipher batch shape: torch.Size([4, 20])

Decoded plain[0]:  'hello world<EOS><PAD><PAD><PAD><PAD><PAD><PAD><PAD><PAD>'
Decoded cipher[0]: 'uryyb jbeyq<EOS><PAD><PAD><PAD><PAD><PAD><PAD><PAD><PAD>'
The batch should be (4, max_len) where max_len is the length of the longest string + 1 (for <EOS>). Shorter sequences are padded with <PAD> (index 0).
Note: In HW05, you'll build a full Rot13Dataset class that generates (ciphertext, plaintext) pairs for training a seq2seq model. The tokenization pattern here is exactly what that dataset uses.
Story Progression
"Good — text is now numbers," says Detective Gaff. "But right now each character is just an arbitrary integer. The number 5 isn't meaningfully different from 6. We need to give each character a richer representation." That's what embedding layers do — they map each token to a learned vector of floating-point numbers...

Task 03: Embedding Lookup (1 pt.)
Use nn.Embedding to embed the tokenized batch from Task 02.
Steps:
- Create an
nn.Embeddinglayer withvocab_size=len(vocab),embedding_dim=32, andpadding_idx=0 - Pass the
plain_batchtensor through the embedding layer - Print the input shape, output shape, and verify the padding positions are zero vectors
- Compute and print the mean embedding norm for non-padding vs padding positions
Task 03: Code (1 pt.)
# TODO: Create embedding layer

print(f"Embedding: {embed}")

# TODO: Embed the plaintext batch from Task 02

print(f"\nInput shape:  {plain_batch.shape}")
print(f"Output shape: {embedded.shape}")

# Verify padding positions are zeros
# Find where the input is <PAD> (index 0)
pad_mask = (plain_batch == 0)
pad_vectors = embedded[pad_mask]
nonpad_vectors = embedded[~pad_mask]

pad_norm = pad_vectors.norm(dim=-1).mean().item()
nonpad_norm = nonpad_vectors.norm(dim=-1).mean().item()

print(f"\nPadding positions:     mean norm = {pad_norm:.4f} (should be 0.0)")
print(f"Non-padding positions: mean norm = {nonpad_norm:.4f} (should be > 0)")

# Show the embedding for the first character of the first sequence
first_char_idx = plain_batch[0, 0].item()
print(f"\nFirst character: '{idx2char[first_char_idx]}' (index {first_char_idx})")
print(f"Its embedding (first 8 dims): {embedded[0, 0, :8].data}")
Embedding: Embedding(31, 32, padding_idx=0)

Input shape:  torch.Size([4, 20])
Output shape: torch.Size([4, 20, 32])

Padding positions:     mean norm = 0.0000 (should be 0.0)
Non-padding positions: mean norm = 5.9488 (should be > 0)

First character: 'h' (index 12)
Its embedding (first 8 dims): tensor([-1.0550, -0.1773, -1.7026,  0.1379,  0.5627,  0.4719, -0.0894,  1.0643])
Task 03: Expected Output (1 pt.)
Embedding: Embedding(31, 32, padding_idx=0)

Input shape:  torch.Size([4, 20])
Output shape: torch.Size([4, 20, 32])

Padding positions:     mean norm = 0.0000 (should be 0.0)
Non-padding positions: mean norm = 5.8346 (should be > 0)

First character: 'h' (index 12)
Its embedding (first 8 dims): tensor([ 1.0238, -0.3479,  0.3487, -0.5984,  1.1851, -1.6770,  0.1611, -0.1229])
The output adds an embedding dimension: (batch, seq_len) → (batch, seq_len, embed_dim). Padding positions are guaranteed to be zero vectors because of padding_idx=0.
Note: In HW05, you'll implement an EmbeddingLayer from scratch (it's essentially a matrix indexing operation) and also use nn.Embedding in the PyTorch RNN and Transformer models.
Story Progression
"Each character now has a meaningful vector representation," you report. "But we still need a model that can process these vectors in order — the meaning of a cipher depends on the sequence." Director Bryant nods. "That's what recurrent neural networks are for — they read text one character at a time, building up context as they go."

Task 04: Build a CharRNN Model (1 pt.)
Build a simple character-level RNN model as an nn.Module that could decode cipher text. The model should:
- Take token indices as input:
(batch, seq_len) - Embed them:
nn.Embedding - Process with RNN:
nn.RNN - Project to vocab logits:
nn.Linear - Output:
(batch, seq_len, vocab_size)— a prediction for each position
Architecture:
- Embedding:
vocab_size→embed_dim=32, withpadding_idx=0 - RNN:
input_size=32,hidden_size=64,batch_first=True - Linear:
64→vocab_size
Task 04: Code (1 pt.)
class RNN(nn.Module):
    def __init__(self, vocab_size, embed_dim, hidden_size):
        super().__init__()

        # TODO: Define the components of the CharRNN model

    def forward(self, x, h0=None):
        # TODO: Forward pass of the RNN

        return logits, h_n

# TODO: Create model and test with cipher_batch from Task 02

print(model)

total_params = sum(p.numel() for p in model.parameters())
print(f"\nTotal parameters: {total_params:,}")

# TODO: Forward pass on the cipher batch

print(f"\nInput shape:  {cipher_batch.shape}")
print(f"Output shape: {logits.shape}")
print(f"h_n shape:    {h_n.shape}")

# Get predicted tokens (untrained — will be random)
predictions = torch.argmax(logits, dim=-1)
decoded_pred = decode(predictions[0].tolist())
print(f"\nPredicted (random): '{decoded_pred}'")
print(f"Actual target:      '{decode(plain_batch[0].tolist())}'")
RNN(
  (embed): Embedding(31, 32, padding_idx=0)
  (rnn): RNN(32, 64, batch_first=True)
  (fc): Linear(in_features=64, out_features=31, bias=True)
)

Total parameters: 9,279

Input shape:  torch.Size([4, 20])
Output shape: torch.Size([4, 20, 31])
h_n shape:    torch.Size([1, 4, 64])

Predicted (random): '<UNK>f<UNK><UNK>acpv<UNK><UNK>pgxsssssss'
Actual target:      'hello world<EOS><PAD><PAD><PAD><PAD><PAD><PAD><PAD><PAD>'
Task 04: Expected Output (1 pt.)
RNN(
  (embed): Embedding(31, 32, padding_idx=0)
  (rnn): RNN(32, 64, batch_first=True)
  (fc): Linear(in_features=64, out_features=31, bias=True)
)

Total parameters: 9,279

Input shape:  torch.Size([4, 20])
Output shape: torch.Size([4, 20, 31])
h_n shape:    torch.Size([1, 4, 64])

Predicted (random): 'ybppjyvb<SOS>oo<PAD>xbwwwwww'
Actual target:      'hello world<EOS><PAD><PAD><PAD><PAD><PAD><PAD><PAD><PAD>'
The output is (batch, seq_len, vocab_size) — one probability distribution over the vocabulary at each position. The predictions are random because the model hasn't been trained yet.
Note: In HW05, you'll build an RNN from scratch (implementing the recurrent block, embedding layer, and backpropagation through time) and also build this same PyTorch version with training. The architecture is identical — you're just learning to use the building blocks here.
Story Progression
You now have all the NLP tools you need to start Homework 05:
Counter+ cosine similarity — measuring text similarity for cipher classification- Character tokenization — converting text to integer sequences with special tokens
pad_sequence— batching variable-length sequences togethernn.Embedding— mapping token indices to dense learned vectorsnn.RNN— processing sequences one step at a time with hidden state
In HW05, you'll use these tools (and build some from scratch) to decode the ransom note cipher. "Once we crack this code," says Director Bryant, "we'll finally know what the kidnapper wrote." Time to file your report!

import os, json

ASS_PATH = "nd-cse-30124-homeworks/labs"
ASS = "lab04"

try:
    from google.colab import _message, files

    repo_ipynb_path = f"/content/{ASS_PATH}/{ASS}/{ASS}.ipynb"

    nb = _message.blocking_request("get_ipynb", timeout_sec=1)["ipynb"]

    os.makedirs(os.path.dirname(repo_ipynb_path), exist_ok=True)
    with open(repo_ipynb_path, "w", encoding="utf-8") as f:
        json.dump(nb, f)

    !jupyter nbconvert --to html "{repo_ipynb_path}"
    files.download(repo_ipynb_path.replace(".ipynb", ".html"))
except:
    import subprocess

    nb_fp = os.getcwd() + f'/{ASS}.ipynb'
    print(os.getcwd())

    subprocess.run(["jupyter", "nbconvert", "--to", "html", nb_fp], check=True)
finally:
    print('[WARNING]: Unable to export notebook as .html')
/Users/wtheisen/Library/CloudStorage/GoogleDrive-wtheisen@nd.edu/My Drive/Artificial Intelligence/CSE 30124 - Introduction to Artificial Intelligence/Homeworks/labs/lab04
[NbConvertApp] WARNING | pattern '/Users/wtheisen/Library/CloudStorage/GoogleDrive-wtheisen@nd.edu/My Drive/Artificial Intelligence/CSE 30124 - Introduction to Artificial Intelligence/Homeworks/labs/lab04/lab04.ipynb' matched no files
This application is used to convert notebook files (*.ipynb)
        to various other formats.

        WARNING: THE COMMANDLINE INTERFACE MAY CHANGE IN FUTURE RELEASES.

Options
=======
The options below are convenience aliases to configurable class-options,
as listed in the "Equivalent to" description-line of the aliases.
To see all configurable class-options for some <cmd>, use:
    <cmd> --help-all

--debug
    set log level to logging.DEBUG (maximize logging output)
    Equivalent to: [--Application.log_level=10]
--show-config
    Show the application's configuration (human-readable format)
    Equivalent to: [--Application.show_config=True]
--show-config-json
    Show the application's configuration (json format)
    Equivalent to: [--Application.show_config_json=True]
--generate-config
    generate default config file
    Equivalent to: [--JupyterApp.generate_config=True]
-y
    Answer yes to any questions instead of prompting.
    Equivalent to: [--JupyterApp.answer_yes=True]
--execute
    Execute the notebook prior to export.
    Equivalent to: [--ExecutePreprocessor.enabled=True]
--allow-errors
    Continue notebook execution even if one of the cells throws an error and include the error message in the cell output (the default behaviour is to abort conversion). This flag is only relevant if '--execute' was specified, too.
    Equivalent to: [--ExecutePreprocessor.allow_errors=True]
--stdin
    read a single notebook file from stdin. Write the resulting notebook with default basename 'notebook.*'
    Equivalent to: [--NbConvertApp.from_stdin=True]
--stdout
    Write notebook output to stdout instead of files.
    Equivalent to: [--NbConvertApp.writer_class=StdoutWriter]
--inplace
    Run nbconvert in place, overwriting the existing notebook (only
            relevant when converting to notebook format)
    Equivalent to: [--NbConvertApp.use_output_suffix=False --NbConvertApp.export_format=notebook --FilesWriter.build_directory=]
--clear-output
    Clear output of current file and save in place,
            overwriting the existing notebook.
    Equivalent to: [--NbConvertApp.use_output_suffix=False --NbConvertApp.export_format=notebook --FilesWriter.build_directory= --ClearOutputPreprocessor.enabled=True]
--coalesce-streams
    Coalesce consecutive stdout and stderr outputs into one stream (within each cell).
    Equivalent to: [--NbConvertApp.use_output_suffix=False --NbConvertApp.export_format=notebook --FilesWriter.build_directory= --CoalesceStreamsPreprocessor.enabled=True]
--no-prompt
    Exclude input and output prompts from converted document.
    Equivalent to: [--TemplateExporter.exclude_input_prompt=True --TemplateExporter.exclude_output_prompt=True]
--no-input
    Exclude input cells and output prompts from converted document.
            This mode is ideal for generating code-free reports.
    Equivalent to: [--TemplateExporter.exclude_output_prompt=True --TemplateExporter.exclude_input=True --TemplateExporter.exclude_input_prompt=True]
--allow-chromium-download
    Whether to allow downloading chromium if no suitable version is found on the system.
    Equivalent to: [--WebPDFExporter.allow_chromium_download=True]
--disable-chromium-sandbox
    Disable chromium security sandbox when converting to PDF..
    Equivalent to: [--WebPDFExporter.disable_sandbox=True]
--show-input
    Shows code input. This flag is only useful for dejavu users.
    Equivalent to: [--TemplateExporter.exclude_input=False]
--embed-images
    Embed the images as base64 dataurls in the output. This flag is only useful for the HTML/WebPDF/Slides exports.
    Equivalent to: [--HTMLExporter.embed_images=True]
--sanitize-html
    Whether the HTML in Markdown cells and cell outputs should be sanitized..
    Equivalent to: [--HTMLExporter.sanitize_html=True]
--log-level=<Enum>
    Set the log level by value or name.
    Choices: any of [0, 10, 20, 30, 40, 50, 'DEBUG', 'INFO', 'WARN', 'ERROR', 'CRITICAL']
    Default: 30
    Equivalent to: [--Application.log_level]
--config=<Unicode>
    Full path of a config file.
    Default: ''
    Equivalent to: [--JupyterApp.config_file]
--to=<Unicode>
    The export format to be used, either one of the built-in formats
            ['asciidoc', 'custom', 'html', 'latex', 'markdown', 'notebook', 'pdf', 'python', 'qtpdf', 'qtpng', 'rst', 'script', 'slides', 'webpdf']
            or a dotted object name that represents the import path for an
            ``Exporter`` class
    Default: ''
    Equivalent to: [--NbConvertApp.export_format]
--template=<Unicode>
    Name of the template to use
    Default: ''
    Equivalent to: [--TemplateExporter.template_name]
--template-file=<Unicode>
    Name of the template file to use
    Default: None
    Equivalent to: [--TemplateExporter.template_file]
--theme=<Unicode>
    Template specific theme(e.g. the name of a JupyterLab CSS theme distributed
    as prebuilt extension for the lab template)
    Default: 'light'
    Equivalent to: [--HTMLExporter.theme]
--sanitize_html=<Bool>
    Whether the HTML in Markdown cells and cell outputs should be sanitized.This
    should be set to True by nbviewer or similar tools.
    Default: False
    Equivalent to: [--HTMLExporter.sanitize_html]
--writer=<DottedObjectName>
    Writer class used to write the
                                        results of the conversion
    Default: 'FilesWriter'
    Equivalent to: [--NbConvertApp.writer_class]
--post=<DottedOrNone>
    PostProcessor class used to write the
                                        results of the conversion
    Default: ''
    Equivalent to: [--NbConvertApp.postprocessor_class]
--output=<Unicode>
    Overwrite base name use for output files.
                Supports pattern replacements '{notebook_name}'.
    Default: '{notebook_name}'
    Equivalent to: [--NbConvertApp.output_base]
--output-dir=<Unicode>
    Directory to write output(s) to. Defaults
                                  to output to the directory of each notebook. To recover
                                  previous default behaviour (outputting to the current
                                  working directory) use . as the flag value.
    Default: ''
    Equivalent to: [--FilesWriter.build_directory]
--reveal-prefix=<Unicode>
    The URL prefix for reveal.js (version 3.x).
            This defaults to the reveal CDN, but can be any url pointing to a copy
            of reveal.js.
            For speaker notes to work, this must be a relative path to a local
            copy of reveal.js: e.g., "reveal.js".
            If a relative path is given, it must be a subdirectory of the
            current directory (from which the server is run).
            See the usage documentation
            (https://nbconvert.readthedocs.io/en/latest/usage.html#reveal-js-html-slideshow)
            for more details.
    Default: ''
    Equivalent to: [--SlidesExporter.reveal_url_prefix]
--nbformat=<Enum>
    The nbformat version to write.
            Use this to downgrade notebooks.
    Choices: any of [1, 2, 3, 4]
    Default: 4
    Equivalent to: [--NotebookExporter.nbformat_version]

Examples
--------

    The simplest way to use nbconvert is

            > jupyter nbconvert mynotebook.ipynb --to html

            Options include ['asciidoc', 'custom', 'html', 'latex', 'markdown', 'notebook', 'pdf', 'python', 'qtpdf', 'qtpng', 'rst', 'script', 'slides', 'webpdf'].

            > jupyter nbconvert --to latex mynotebook.ipynb

            Both HTML and LaTeX support multiple output templates. LaTeX includes
            'base', 'article' and 'report'.  HTML includes 'basic', 'lab' and
            'classic'. You can specify the flavor of the format used.

            > jupyter nbconvert --to html --template lab mynotebook.ipynb

            You can also pipe the output to stdout, rather than a file

            > jupyter nbconvert mynotebook.ipynb --stdout

            PDF is generated via latex

            > jupyter nbconvert mynotebook.ipynb --to pdf

            You can get (and serve) a Reveal.js-powered slideshow

            > jupyter nbconvert myslides.ipynb --to slides --post serve

            Multiple notebooks can be given at the command line in a couple of
            different ways:

            > jupyter nbconvert notebook*.ipynb
            > jupyter nbconvert notebook1.ipynb notebook2.ipynb

            or you can specify the notebooks list in a config file, containing::

                c.NbConvertApp.notebooks = ["my_notebook.ipynb"]

            > jupyter nbconvert --config mycfg.py

To see all available configurables, use `--help-all`.

[WARNING]: Unable to export notebook as .html
---------------------------------------------------------------------------
ModuleNotFoundError                       Traceback (most recent call last)
Cell In[25], line 7
      6 try:
----> 7     from google.colab import _message, files
      9     repo_ipynb_path = f"/content/{ASS_PATH}/{ASS}/{ASS}.ipynb"

ModuleNotFoundError: No module named 'google.colab'

During handling of the above exception, another exception occurred:

CalledProcessError                        Traceback (most recent call last)
Cell In[25], line 25
     22     nb_fp = os.getcwd() + f'/{ASS}.ipynb'
     23     print(os.getcwd())
---> 25     subprocess.run(["jupyter", "nbconvert", "--to", "html", nb_fp], check=True)
     26 finally:
     27     print('[WARNING]: Unable to export notebook as .html')

File /Library/Developer/CommandLineTools/Library/Frameworks/Python3.framework/Versions/3.9/lib/python3.9/subprocess.py:528, in run(input, capture_output, timeout, check, *popenargs, **kwargs)
    526     retcode = process.poll()
    527     if check and retcode:
--> 528         raise CalledProcessError(retcode, process.args,
    529                                  output=stdout, stderr=stderr)
    530 return CompletedProcess(process.args, retcode, stdout, stderr)

CalledProcessError: Command '['jupyter', 'nbconvert', '--to', 'html', '/Users/wtheisen/Library/CloudStorage/GoogleDrive-wtheisen@nd.edu/My Drive/Artificial Intelligence/CSE 30124 - Introduction to Artificial Intelligence/Homeworks/labs/lab04/lab04.ipynb']' returned non-zero exit status 255.